While the ground outside might still be too cold or wet to work, you do not have to wait to begin your gardening journey for the year. Starting seedlings indoors is a wonderful way to bridge the gap between the grey of winter and the green of spring, allowing you to nurture fragile life in the warmth of your home before the outdoor season truly begins.
Starting your own seeds offers a deep sense of satisfaction that buying established plants simply cannot match. It transforms the act of gardening from a seasonal chore into a continuous, life-affirming cycle.
Whether you are a seasoned green thumb or looking to grow your very first tomato plant, the process of seed starting is accessible, rewarding, and a perfect way to bring a little bit of nature indoors while the frost still lingers on the windowpane.
- post content
- Why Start Seedlings Indoors?
- What You’ll Need
- When to Start
- How to Start Seedlings Indoors
- Caring for Your Seedlings
- Hardening Off Seedlings
- Transplanting Seedlings Outdoors
- Troubleshooting Common Problems
- conclusion: Get Ready to Grow!
- view table:content summary
- view notes:collective tips
- view ideas:latest remodeling analysis
- view post (new win):Complete Guide to Robotic Mowers
Why Start Seedlings Indoors?
There are compelling reasons to start your garden from scratch indoors rather than waiting to buy transplants from a nursery later in the spring. One of the primary benefits is the sheer variety available to you.

Garden centers typically stock a limited selection of popular varieties, but when you buy seeds, the options are nearly endless.
You can choose heirloom tomatoes with unique histories, peppers with specific heat levels, or flowers in rare colors that you would never find on a store shelf. This allows you to curate a garden that is truly unique to your tastes and your landscape.
Beyond the variety, starting seeds indoors gives you a significant head start on the growing season. Many vegetables and flowers require a long growing season to reach maturity and produce fruit or blooms.
In cooler climates, the outdoor growing window might be too short for crops like peppers, tomatoes, or eggplants to thrive if planted directly in the ground.
By starting them indoors weeks or even months ahead of the last frost, you ensure that your plants are strong, established, and ready to produce as soon as the weather warms up. It is also a budget-friendly approach, as a packet of seeds costs a fraction of what you would pay for an equivalent number of starter plants.

What You’ll Need
Gathering your supplies is the first step toward a successful indoor garden, and you likely already have some of what you need at home. You will need containers for your seeds.
These can be specialized seed-starting trays or peat pots, but you can also upcycle household items like yogurt cups or egg cartons, provided you poke drainage holes in the bottom. The most critical supply is your growing medium.
Garden soil is too heavy and may contain pathogens that can harm young seedlings, so it is best to use a sterile seed-starting mix. This light, fluffy mixture usually contains peat moss or coconut coir, vermiculite, and perlite, designed to hold moisture while allowing delicate roots to grow easily.
Light is the other essential component. While a sunny south-facing window can work for some plants, winter sunlight is often too weak to support robust growth. Using artificial grow lights or simple fluorescent shop lights can make a dramatic difference in the health of your seedlings.
You might also consider a heat mat, which sits underneath your trays to warm the soil, encouraging faster and more uniform germination. Finally, having labels is helpful so you do not lose track of what you planted where, and a clear plastic dome or plastic wrap can help retain humidity during the germination phase.
When to Start
Timing is everything when it comes to starting seeds. Start too early, and your plants may become overgrown and root-bound before it is safe to move them outside. Start too late, and they may not be mature enough to survive the transition. The key to perfect timing lies on the back of your seed packet and in understanding your local frost dates.
Your specific hardiness zone will determine your average last frost date, which is the estimated day when the risk of freezing temperatures has passed in your area. Most seed packets will instruct you to start seeds indoor a specific number of weeks before this date.
For example, tomatoes might need to be started six to eight weeks before the last frost, while faster-growing crops like cucumbers might only need three or four weeks. Create a simple calendar or schedule based on your frost date to keep your planting organized and stress-free.
How to Start Seedlings Indoors
Once you have your supplies and your schedule, the planting process is a gentle and straightforward task. Begin by moistening your seed-starting mix in a bucket or bowl with warm water until it feels like a wrung-out sponge.
It should be damp but not dripping wet. Fill your containers with the pre-moistened mix, pressing down lightly to remove large air pockets, but be careful not to pack it too tightly, as the roots need room to breathe.
Check your seed packet for the recommended planting depth. A good general rule is to plant a seed twice as deep as it is wide. For tiny seeds, this means simply pressing them onto the surface of the soil and barely dusting them with mix.
For larger seeds, you can make a small indentation with your finger or a pencil eraser. Place two or three seeds in each cell or pot to ensure at least one germinates.
Cover the seeds with soil and mist the surface gently with water. To create a humid, greenhouse-like environment, cover the trays with a plastic dome or plastic wrap and place them in a warm spot, such as on top of the refrigerator or on a heat mat.
about flower plantings

Understanding Perennial and Annual Flower Plantings
In the world of gardening, the choice between planting annuals and perennials can drastically shape the aesthetic and functional aspects of your garden. Each type of plant offers its unique benefits and challenges, influencing not only the seasonal display but also the maintenance and long-term planning of your garden space.
Part-Sun Annuals
Caring for Your Seedlings
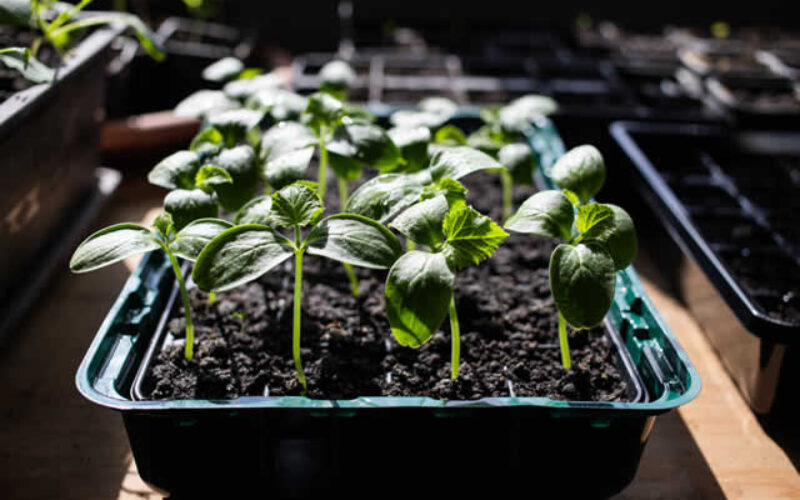
As soon as the first green shoots emerge from the soil, remove the plastic cover and move the seedlings to your light source. This is the stage where your seedlings need the most attention and care.
If you are using artificial lights, keep them just a few inches above the tops of the plants, raising the lights as the seedlings grow. This prevents the plants from stretching and becoming "leggy" or weak as they search for light. If you are relying on a window, rotate your trays daily so the plants do not lean too far in one direction.
Watering requires a delicate balance. The goal is to keep the soil consistently moist but never soggy, which can lead to fungal diseases. Watering from the bottom is often the best method.
Place your pots or trays in a shallow pan of water and let the soil wick up moisture through the drainage holes for ten to twenty minutes, then remove them.
Once your seedlings develop their first set of "true" leaves—the leaves that look like the mature plant, appearing after the initial seed leaves—you can begin feeding them with a diluted liquid fertilizer to support their rapid growth. If multiple seeds sprouted in one pot, use scissors to snip off the weaker ones at the soil line, leaving only the strongest seedling to grow.
Hardening Off Seedlings
Before your pampered indoor plants can face the great outdoors, they need to undergo a process called "hardening off." The outdoor environment is harsh compared to the consistent warmth and stillness of your home. Direct sunlight can scorch tender leaves, and wind can break fragile stems if plants are not acclimated gradually.
Begin the hardening off process about a week or two before you plan to transplant them into the garden. On a mild day, place your seedlings outside in a sheltered, shady spot for just an hour or two, protected from strong wind and direct sun.
Bring them back inside for the night. Each day, gradually increase the amount of time they spend outside and the amount of sunlight they receive. By the end of the period, they should be able to spend the entire day and night outdoors, ready to take root in their permanent home.
Transplanting Seedlings Outdoors
When the weather has settled and the danger of frost has passed, it is time to plant. Choose a calm, cloudy day or plant in the late afternoon to protect your seedlings from the intense midday sun while they settle in.
Dig a hole slightly larger than the root ball of your seedling. Carefully remove the plant from its container, handling it by the leaves rather than the delicate stem, and place it in the hole.
Fill in the space around the roots with soil and press down gently to secure the plant. Water immediately and thoroughly to help settle the soil and eliminate air pockets around the roots. For the first few days, keep a close eye on your new transplants, ensuring they have enough water as they establish themselves in the garden bed.
about vegetable garden plantings

Spring is Almost Here! It’s Time to Grow Your Own Vegetables
Growing your own vegetable garden is a rewarding and sustainable way to ensure a fresh supply of healthy produce while connecting with nature. This guide is designed to walk you through every step of the process, from planning your garden layout to nurturing your plants for a successful harvest.
Troubleshooting Common Problems
Even with the most nurturing care, challenges can arise. One of the most common issues is "damping off," a fungal condition that causes young seedlings to suddenly wither and fall over at the soil line.
This is often caused by excessive moisture and poor air circulation. To prevent this, use sterile soil, avoid overwatering, and consider using a small fan to circulate air around your trays.
Another frequent problem is weak, spindly growth. This is almost always a sign that the plants are not getting enough light. If your seedlings look tall and pale, move your grow lights closer or find a sunnier location. Occasionally, you might notice mold growing on the soil surface.
While often harmless to the plant, it indicates high humidity. You can scrape it off gently and reduce watering frequency or increase airflow to correct the environment.
Get Ready to Grow!
Starting seedlings indoors is a labor of love that connects you intimately with the seasons. It requires patience and observation, but the reward of watching a dry seed transform into a vibrant, food-producing or flowering plant is a true miracle of nature.
By taking these steps, you are not just growing plants; you are cultivating a living space that brings joy and beauty to your home. As spring approaches, you can look forward to a garden that you nurtured from the very beginning.
other related analysis of interest: (new win)
Transform Your Outdoor Space with Beautiful Container Gardening
| Section | Description | Details |
|---|---|---|
| Introduction | The concept of starting seedlings indoors | Beginning the gardening season indoors helps prepare plants for an optimal start before outdoor planting is possible. This method nurtures plants in a controlled environment, ensuring a thriving garden come spring. |
| Benefits | Why to start seedlings indoors | Starting seeds indoors allows gardeners to access a wider variety of plants, extend the growing season, and save money compared to purchasing mature plants. It’s particularly advantageous in colder climates. |
| Supplies Needed | Essential tools and materials | Items such as seed-starting trays, sterile seed-starting mix, grow lights, and heat mats are required. Recycled containers can be used, and organized labeling simplifies the process. |
| Timing | When to begin planting seeds indoors | Using local frost dates and seed packet guidelines, seeds should be started weeks before the last frost. Different plants require varying lead times, ranging from 3 to 8 weeks. |
| Planting Process | Steps to plant seeds indoors | Prepare seed-starting mix, plant seeds at the correct depth, and maintain moisture levels in a warm location. Use plastic covers to retain humidity during germination. |
| Caring for Seedlings | How to ensure healthy growth | Provide adequate light, water carefully to prevent mold or damping-off, and begin fertilization after true leaves develop. Thin seedlings to avoid overcrowding. |
| Hardening Off | Preparing seedlings for outdoor conditions | Gradually introduce seedlings to outdoor conditions over 1–2 weeks before transplanting. Start with short, shaded exposure, increasing light and duration daily. |
| Transplanting | Moving seedlings to the garden | Transplant on a cloudy day or late afternoon. Plant in prepared garden soil, ensuring adequate water and care during the initial adjustment period. |
| Troubleshooting | Common issues and solutions | Address damping-off with better air circulation and dry soil. Increase light exposure for weak seedlings and reduce humidity to combat mold on soil surfaces. |
| Closing Thoughts | The joy of indoor gardening | Starting seedlings indoors fosters a deep connection to the gardening process and helps create a vibrant, thriving outdoor space when spring arrives. |

Find Landscaping/Maintenance Landscape Design Landscape Maintenance Pest Control Sprinkler Systems Tree & Shrubs Water Features top-rated, pre-screened local contractors FREE: download contractor selection enter zip code – powered by HomeAdvisor ™


Image credit: start seedlings indoors by envato.com
end of post … please share it!
| more photo remodeling |
Jump Over to Our Photo Analysis Center for Ideas on
"Renovating Home"
|__________________________________________________________|
home remodeling surprise
find out where it might go - new win


Helpful article? Leave us a quick comment below.
And please share this article within your social networks.