Quick answer:
A successful DIY garage floor epoxy coating requires thorough surface preparation—cleaning, crack repair, etching, and moisture testing—followed by selecting the right epoxy type, applying one or two coats at the correct temperature, waiting up to 72 hours before driving on it, and following a simple long-term maintenance routine. Done correctly, the results can last up to 20 years.
A stained, cracked, or dull garage floor does more than look uninviting—it signals neglect and, over time, deteriorates further under vehicle weight, chemical spills, and moisture.
A properly applied epoxy coating solves all of that in a single weekend project.
Success, however, depends on getting five things right: thorough surface preparation, the correct epoxy selection, careful application technique, adequate cure time, and a simple ongoing maintenance routine.
- post content
- 1: Prepare The Floor First
- 2: Choose The Right Epoxy Type
- 3: Apply The Coating Carefully
- 4: Respect The Cure Timeline
- 5: Care For Your New Floor
- conclusion
- view table:content summary
- view notes:collective tips
- view analysis:Garage Decluttering Solutions
- view ideas:latest remodeling analysis
1: Prepare The Floor First
Preparation is the most consequential step in the entire project. Every expert source agrees on this point, and no amount of premium epoxy will compensate for a poorly prepped surface.
-
Clearing and Cleaning the Surface
Start by removing everything from the garage—every shelf, tool, car, and storage bin. Once the space is clear, sweep thoroughly and wipe down any oil or grease spots with rags before applying anything wet to the surface. Grease doesn’t just look bad; it actively prevents epoxy from bonding.
One important note if you’re working with a newly poured slab: fresh concrete must cure for a minimum of 28–30 days before any coating is applied. Coating too early traps moisture and guarantees failure.
-
Repairing Cracks and Imperfections
Once clean, inspect the concrete carefully. Small cracks and pits need to be filled with a concrete patching compound or epoxy crack filler before any coating goes down. Epoxy is a surface coating, not a structural repair—it will telegraph every crack beneath it and, over time, failure begins right there at those weak points. Fill, let cure fully, then proceed.
Begin by removing everything from the garage and sweeping the floor clean. Any grease, oil, or chemical stains must be addressed with a concrete degreaser before anything else, because epoxy will not bond to contaminated concrete.
Once the floor is clean, inspect it closely for cracks, holes, and hairline fractures. Fill these with a concrete patching compound and allow it to cure fully before moving on. Even high-build epoxy coatings will telegraph surface irregularities if left unaddressed, so this step is not optional.
-
Etching or Grinding the Concrete
Etching is the step most DIYers underestimate, and skipping it is one of the most common reasons epoxy peels. Uncoated concrete must be etched with a concrete and masonry cleaner/etcher solution applied with a pump sprayer, left to dwell for 10–20 minutes, and then vigorously scrubbed with a stiff non-metal brush.
Rinse thoroughly with a high-pressure hose, remove excess water with a squeegee, and allow the floor to dry completely. According to Behr’s application guidelines, the surface is ready when it feels like medium-grit sandpaper and no loose concrete or residue remains.
If your floor has an existing coating, grinding is the more reliable option over chemical etching, as it creates the mechanical profile epoxy needs to grip.
-
Understanding Moisture Testing
Epoxy is hydrophobic—it repels water. Apply it over damp concrete and you’re setting up a coating that will bubble, blister, and peel. Testing moisture levels before you begin is non-negotiable, especially in humid climates or on slabs with ground contact.
The plastic-square method is the easiest DIY option: tape a 20-inch square of plastic sheeting or aluminum foil flat against several areas of the floor for 24–48 hours. Moisture on the underside of the plastic means moisture is rising through the slab.
According to Floorguard Products, if moisture vapor transmission exceeds three pounds of water vapor per 1,000 square feet, you should hold off on epoxy application until conditions improve or apply a moisture-barrier primer first.
getting everything organized

Garage Decluttering Solutions: Keeping Your Organized and Assemble
When was the last time you parked your car in your garage? For many homeowners, garages have become more of a storage shed than a space to keep their vehicles.

2: Choose The Right Epoxy Type
Not all epoxy products perform alike, and choosing the wrong one is a common and costly mistake. Three main categories cover most garage applications.
-
Different Types of Epoxy
Three main categories of epoxy exist for garage floors, and they differ in durability, VOC content, and working time.
- Water-based epoxy is the most DIY-friendly option. It dries in 12–24 hours and reaches full cure in 5–7 days. It’s lower in VOCs, easier to clean up, and forgiving to apply—though it’s the least durable of the three.
- Solvent-based epoxy offers stronger chemical resistance and better adhesion, with a full cure time of 7–10 days. The trade-off is higher VOC emissions, requiring serious ventilation during application.
- 100% solids epoxy is the professional-grade choice. It’s the most durable, most chemical-resistant, and most expensive. Full cure runs 7–14 days. It also has the tightest application window, making it more demanding for a first-time installer.
-
Making the Selection
For a weekend DIY project, water-based epoxy from a reputable brand strikes the right balance between performance and ease of use. Whatever you choose, use a true two-part epoxy system (Part A resin + Part B hardener), not epoxy paint—a single-part product that wears out far faster and doesn’t offer the same chemical resistance.
One-part acrylic floor paint is the easiest to apply and requires no mixing, but it offers the least durability. It resists light stains and improves the appearance of concrete, though it won’t hold up well to hot tires, heavy vehicles, or chemical spills over time. It also takes the longest to cure—up to five days before vehicle traffic is safe, according to Rust-Oleum.
Two-part water-based epoxy is the most popular choice for DIY garage projects. It consists of a resin and a hardener that must be mixed together before application. Rust-Oleum’s EpoxyShield, for example, is five times stronger than a standard one-part product.
This category resists hot tire pickup, oil, antifreeze, and road salt, making it genuinely practical for a working garage. It is available in multiple colors and can be embellished with decorative color flake chips.
Polycuramine coating, such as Rust-Oleum RockSolid, represents the highest-performance tier available to DIYers. It is approximately 20 times more durable than standard epoxy and cures fast enough to accept vehicle traffic the following day.
For homeowners who want a showroom-quality, long-lasting finish without hiring a professional, Polycuramine is worth the additional investment.
-
Essential Tools and Materials
You’ll need a 2–2.5 inch nylon/polyester brush for cutting in along the perimeter, a 3/8-inch nap roller for the main floor area, an extension pole, a roller tray, stir sticks, chemical-resistant gloves, and protective eyewear.
A pump sprayer is useful for the etching stage. Having a squeegee on hand helps manage excess water during prep and cleanup.
3: Apply The Coating Carefully
Temperature and ventilation matter enormously during application. Apply epoxy only when the ambient temperature falls between 60°F and 85°F.
Too cold and the coating won’t cure properly; too warm and it may begin to set before you finish. Open garage doors and windows to maintain airflow throughout the process.
-
Mixing the Epoxy Components
Follow the manufacturer’s mixing ratio precisely—this is chemistry, not cooking. Pour Part B (hardener) into Part A (resin) as directed, stir slowly and thoroughly, and allow the mixture to rest for any prescribed induction time before application.
Most products have a working time (pot life) of 20–40 minutes once mixed, so plan your sections accordingly and don’t mix more than you can apply before it begins to set.
-
Applying the First Coat Evenly
Temperature matters significantly here. The optimal application range is 60°F to 90°F (15°C to 32°C). Avoid applying epoxy to concrete that is warming from direct sun exposure—apply when the slab is cooling, typically in the afternoon if working outdoors or in an uninsulated garage. Coating warming concrete causes the epoxy to off-gas and form bubbles.
Begin by cutting in a 2–3 inch border along the perimeter with your brush, starting from a far corner and working toward the door.
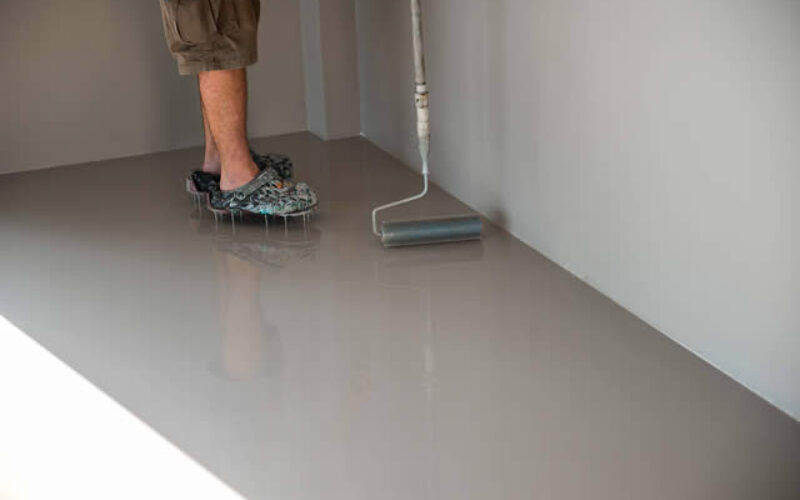
Then fill the main field with a roller, working in 4-foot by 2-foot sections, rolling back into the previous section to maintain a wet edge. Always work from the deepest corner toward the exit—do not paint yourself into a corner.
-
Addressing Bubbles and Imperfections
Small bubbles can appear when epoxy is applied too thickly or when the concrete releases trapped air. A spiked roller passed lightly over the wet surface immediately after application helps break surface bubbles.
If you notice larger voids or missed spots, address them while the coating is still wet. Once it begins to cure, trying to touch up wet epoxy over a setting coat creates adhesion problems.
-
When to Apply a Second Coat
A second coat is not always mandatory, but it is strongly recommended in high-traffic garages. It adds depth, improves chemical resistance, and dramatically extends the floor’s lifespan.
The key rule: the first coat must be fully cured before the second is applied—not just dry to the touch. Consult your product’s technical data sheet for the specific recoat window, as applying the second coat too late can prevent proper intercoat adhesion.
adding something once the floored is cured

The Essential Garage Upgrade Every Homeowner Needs
If you’ve been contemplating enhancing your garage with practicality and efficiency, a garage workbench might just be the answer you’ve been seeking.
4: Respect The Cure Timeline
The coating may feel dry to the touch within hours, but curing is a chemical process that takes significantly longer. Walking on a two-part epoxy coating before it has properly set risks leaving footprints and damaging the finish.
-
Understanding Cure Times
Dry time and cure time are not the same thing, and confusing them is where many DIYers run into trouble. Dry time means the surface is no longer wet. Cure time means the epoxy has fully hardened and cross-linked to its maximum strength.
According to data from AtoZ Epoxy Flooring and Tough Floors Brisbane, here is what you can generally expect at normal temperatures (around 70°F):
The floor reaches touch-dry status in approximately 6–12 hours. Light foot traffic is safe after 12–24 hours. Furniture and light vehicle use can return after 48–72 hours. Full cure—the point at which the floor reaches maximum hardness—takes approximately 7 days.
-
Optimal Ventilation and Temperature
Maintain good airflow throughout the curing process. Fans and open doors help moisture evaporate and stabilize the curing environment.
Keep humidity below 85% during both application and the first 24 hours of curing to prevent blushing—a milky discoloration that results from excess moisture interfering with the chemical reaction.
In cooler environments (below 60°F), cure times can nearly double. A basement garage or an unheated garage in colder months may require 10–14 days to fully cure, especially with solvent-based or 100% solids products.
5: Care For Your New Floor
A well-applied epoxy garage floor can last up to 20 years with the right maintenance routine, according to GarageExperts. The good news is that epoxy is one of the easiest flooring surfaces to care for.
-
Regular Cleaning and Care
With proper maintenance, a correctly installed epoxy floor can last up to 20 years, according to GarageExperts. That longevity depends on a simple, consistent cleaning routine.
Daily or every few days, sweep with a soft-bristle broom or microfiber dust mop to prevent fine grit from acting like sandpaper underfoot. Weekly, mop with a pH-neutral cleaner diluted in warm water using a microfiber or sponge mop—never a string mop, which leaves streaks.
Monthly or quarterly, do a deeper clean using a slightly stronger solution. For stubborn grease, a household degreaser applied briefly and scrubbed with a soft deck brush works well, provided it’s rinsed thoroughly before drying on the surface.
Avoid bleach, vinegar, citrus-based cleaners, and anything acidic or highly alkaline—these degrade the epoxy finish over time. Also skip abrasive scrub pads and high-pressure washing above 1,200 PSI, which can force water under the coating at the edges.
-
Protecting Against Stains and Chemicals
Wipe up oil, antifreeze, and chemical spills immediately. Epoxy is highly resistant to these substances, but prolonged contact, especially at elevated temperatures, can cause staining or softening.
Placing parking pads under tires helps too—hot tires fresh from the road can leave marks on the surface, particularly in the first few months after application when the coating is still hardening at a molecular level.
-
Extending the Life of Your Coating
Lift heavy items rather than dragging them across the floor. Use rubber feet or furniture pads under workbenches and shelving units. Every few months, inspect high-traffic areas and corners for dull spots or minor surface wear.
Catching small issues early—before they become peeling sections—makes touch-up repairs far simpler and less disruptive.
Sweep the floor regularly using a soft-bristle broom or microfiber dust mop to prevent fine grit from accumulating and scratching the surface. For routine mopping, a pH-neutral cleaner diluted in warm water is all that is needed.
Avoid bleach, vinegar, citrus-based sprays, and acidic or highly alkaline cleaners—these degrade the epoxy finish over time. Never apply wax or polish; neither bonds properly to epoxy and both leave a slippery, cloudy residue.
Spills—particularly oil, antifreeze, or chemicals—should be wiped up immediately before they have a chance to penetrate or stain the coating. For deep cleaning every month or quarter, a small amount of diluted ammonia (roughly 2 to 3 ounces per gallon of hot water) can be used to cut through heavy grease buildup.
If a pressure washer is used for seasonal cleaning, keep it below 1,200 PSI to avoid forcing water beneath the coating.
Place parking pads under vehicle tires to prevent hot-tire marks, and use rubber mats or furniture pads under heavy equipment and shelving to protect the surface from gouging. Inspect high-traffic zones every few months for chips or dull patches, addressing minor damage early before it spreads.
Elevate Your Garage
Your newly coated garage floor looks stunning, but it could truly shine as a functional space with the addition of a dedicated charging station for your electric vehicle (EV) and tools.
Installing a charging station not only adds convenience but also enhances the practicality of your garage.
It ensures your EV is always ready for the road while providing an organized hub for powering tools and gadgets.
By taking this step, you’re turning your garage into a modern space that meets both your lifestyle and sustainability goals.
view ideas: Home EV Charging Stations (new win)

begin with a title and then write a brief paragraph about [your garage floor is looking so nice, but it lacks one thing, a dedicated charging station of your EV and tools]
A Weekend Project With Lasting Payoff
Coating a garage floor with epoxy is genuinely achievable in a single weekend—if the work is done in the right order. Rushing the prep phase, skipping the moisture test, or returning vehicles too early are the mistakes that cause projects to fail.
Follow the sequence outlined here, respect the cure times, and keep up a simple cleaning routine, and you will have a durable, attractive floor that protects your concrete for years to come.
home improvement ideas to consider (complete directory – new win):


| Step | Details | Important Notes |
|---|---|---|
| Surface Preparation | Remove all items from the garage and sweep thoroughly. Address grease, oil, or chemical stains with a concrete degreaser. Inspect for cracks and imperfections and fill them with a concrete patching compound. Clean and ensure the surface is even. | Fresh concrete should cure for at least 28–30 days before applying epoxy. |
| Etching or Grinding | Apply a concrete/masonry cleaner or etcher, scrub with a stiff brush, rinse thoroughly, and allow the floor to dry completely. If the floor has an old coating, grinding is recommended for better adhesion. | Surface should feel like medium-grit sandpaper and be free of loose particles. |
| Moisture Testing | Use the plastic-square method to check for moisture levels over 24–48 hours. Proper moisture levels are critical to successful epoxy application. | Moisture issues may require applying a moisture-barrier primer. |
| Epoxy Selection | Choose from three main types—water-based epoxy for easy application, solvent-based epoxy for stronger adhesion, or 100% solids for professional-grade durability. Water-based epoxy is the most DIY-friendly for a weekend project, while higher-grade options like Polycuramine offer enhanced performance. | Always use a true two-part epoxy (resin + hardener) and avoid single-part epoxy paint or acrylic floor paint for long-term durability. |
| Application | Mix epoxy components (resin and hardener) as directed. Apply the first coat while maintaining a wet edge. For a second coat, ensure the first coat is fully cured, and if adding decorative flakes, do so while the first coat is wet. | Maintain optimal temperature and ventilation during application (60°F–85°F) and use proper protective gear like gloves and eyewear. |
| Cure Time | Allow light foot traffic after 12-24 hours and vehicle use after 48-72 hours. Full cure takes 7+ days, depending on the product. | Avoid disrupting the curing process by maintaining airflow and monitoring room temperature and humidity. |
| Maintenance | Sweep regularly and mop with a pH-neutral cleaner. Avoid acidic or highly alkaline cleaners. Address stains or spills immediately. Monitor for signs of wear and make touch-up repairs as needed. | Proper care extends epoxy lifespan up to 20 years. Use floor mats under heavy equipment and vehicle tires to prevent damage. |

Find Garage Services Garage Doors Garage Door Openers Driveways Concrete Floor Coating Minor Remodels Major Remodels Electrical Plumbing top-rated, pre-screened local contractors FREE: download contractor selection enter zip code – powered by HomeAdvisor ™


Image credit: DIY garage floor expoxy by envato.com
end of post … please share it!
| more photo remodeling |
Jump Over to Our Photo Analysis Center for Ideas on
"Renovating Home"
|__________________________________________________________|
home remodeling surprise
find out where it might go - new win


Helpful article? Leave us a quick comment below.
And please share this article within your social networks.